Wednesday 30 November 2016

Tudor Inspired Birthday Card :D


I called this monochrome card a Tudor inspired birthday card because... the last time I visited Hampton Court Palace (where Henry the VIII lived) I noticed a tiled floor pattern made from octagons and squares, and as soon as I saw this Wagon Wheel Spellbinders die, all I could see was the octagon and square pattern so I emphasized this by cutting away part of the design, and I teamed it up with some more Spellbinders dies featuring fleur de lis as there's also a lot of them in ceilings and mouldings around the Palace too :D

I used a number of Spellbinders dies for this card including... the Wagon Wheel background from the Geo collection (exclusive to Create & Craft), A Gilded Life Crowns, the Ornate Arrows and the Royal Circles too :D I also used some Pebeo Fantasy Paints (colours are below the photo further down) in the Moon and Prisme finishes to fill in the octagons and squares within the wagon wheel design :D For the black elements in the foreground, I used Black Soot Distress Ink, and for the pearly elements I used the Artiste Pearl Medium paint :D For the final finishing touches I added some Gloss White and Gloss Ebony Black #Nuvo crystal drops, I used ones that I had previously made, but I also showed at the end of the video how I made some more to replace the ones I'd used :D The yellow paper I'm using is the backing paper from a piece of double sided sticky sheet :D Hope you liked the card! If you have any more questions, please do leave them below, although you might find the answers in the blog post for the first card I posted using these paints, as I wrote out in more detail what I was doing.... here's the link :D

To see the process behind this Tudor inspired card, please watch my YouTube video below or over on my channel CRaFTi PoTeNTiAl :D 


To see all the other cards I've made using these magical Pebeo paints, please check out my Playlist which I've linked below :D 


 Lots more photos below :D


The Pebeo Fantasy Paints used: Moon Pearl, Prisme Eggshell White and Prisme Onyx Black :D 


I'm entering this card into the Simon Says Stamp Anything Goes Wednesday Challenge :D

Tuesday 29 November 2016

Nuvo Mousse on the Gelli Plate :D


A pair of thank you cards using the Nuvo Embellishment Mousse on the Gelli plate!! As well as through a stencil (made from the intricate lattice insert from the Kings Cross Case die set (765E) from Tonic) and just blended straight onto the card using my finger too (just as you would with gilding wax) :D I'd been itching to try this embellishment mousse, especially after I had the idea to see if they'd work on the Gelli plate with a brayer, so I decided to buy a couple of colours to give it a go, and I thought these two (Aquamarine and Spring Green) looked gorgeous :D

So as I said above the 'stencil' I'm using on the Gelli plate is made from a Tonic die set and I was using a combination of Aquamarine (807N) and Spring Green (808N) Nuvo Embellishment Mousse along with Avocado Artiste Acrylic paint to add a little bit of vibrancy :D And the mix I added through the punchanella was the acrylic paint with a little bit of sparkly Cosmic Shimmer glitter paste :D And you can see my process of creating the backgrounds in the YouTube video below :D TOP TIP: scoop out a pile of mousse and squish it onto your glass mat, then dip your palette knife into some clean water and add some to the paste to make its consistency more slack, more like an acrylic paint, this will ensure that you'll be able to apply it to your Gelli plate with your brayer more easily :D

I decided for both cards to stick white die-cuts over the background so that most of it is still visible :D For one card I used the smaller intricate lattice die and outside rectangle die again from the Kings Cross Case die set (765E), and for the other card I used the larger lattice die (765E) and teamed this up with the scalloped edge and straight edge circle and square layering dies (1452E, 1453E, 1454E, 1455E) also from Tonic Studios to create multiple frames :D And then I stuck part of the lattice behind some frames, and a piece of vellum behind others, then I layered them up on top of one another either using wet glue or thin strips of 3D foam :D For the sentiment on both cards, I added a strip of vellum, with a small piece of card behind (again blended with the embellishment mousse) to give the word a place to sit, I then used the Lawn Fawn scripty Thanks die and again blended this with the mousse in the opposite colour to that of the strip of card behind the vellum :D The final finishing touch was then the addition of some Gloss White Nuvo Crystal Drops which I had created earlier, I just had to buy the white version, as I knew it would come int so handy!! :D  (however I also showed how I made some more to replace these in the video :D) Hope you liked the cards :D I sent the card in the photo above to Tonic Studios to say thank you for the dies and pens they sent me, some of which I used on the card :D I hope they liked it too :D

To see the process behind this pair of Gelli print cards, please watch my YouTube video below, or over on my channel CRaFTi PoTeNTiAl :D 


To see more cards I've made using products from Tonic Studios, please check out my Playlist below :D 


Tonnes and tonnes more photos below :D


Monday 28 November 2016

Ink Blended Thank You :D


A quick and simple pair of thank you cards using dies to create masks from full adhesive post-it notes :D I used the Lawn Fawn Quinns ABC's dies along with the Lawn Fawn Scripty Thanks die to create my masks using the full adhesive post-it notes :D I stuck two post-its to a regular post-it and die cut both at once so I could easily make two cards :D Once die cut, I snipped the 's' off of the end of the word thanks to give 'thank' and then I used the letters 'y', 'o'  and 'u' from the Quinns abc dies :D

I simply used the Tim Holtz mini ink blending tool to apply my ink, and I did an ombre effect going from Mustard Seed to Spiced Marmalade to Abandoned Coral Distress Ink :D I then used the Avery Elle Brushed stamp set and the same Distress Inks to add some interest, and to create even more colour variation, I also splashed on some water to lift some of the colour too :D The finishing touches were then some doodling using a black pen and a scattering of sequins :D Hope you liked the cards :D

To see the process behind these cards, please watch my YouTube video below, or over on my channel CRaFTi PoTeNTiAl :D


Lots more photos below :D


Sunday 27 November 2016

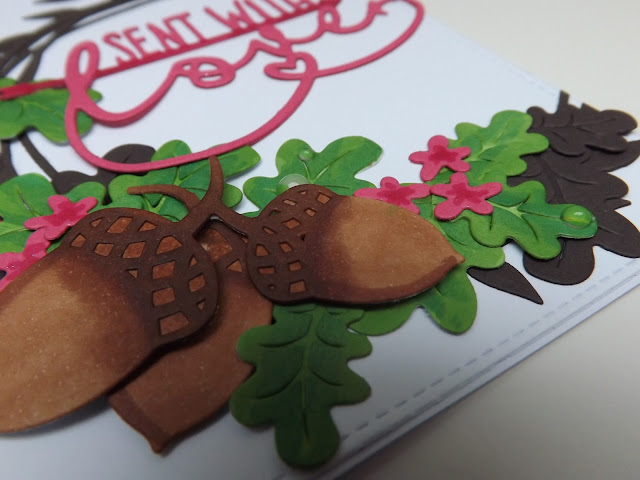
Sent With Love Autumn Wreath :D


A gorgeous autumn wreath card! (I really LOVE the way this card came out! even better than I had imagined in my head :D) Although it has the gorgeous 'Sent With Love' sentiment from @tonicstudios, I'm using it as a thank you card for my Mum and Dad :D Along with the Tonic sentiment die (1254E), I also used their Morning Dew Crystal Drops, I brought this colour of drops recently, and it is FANTASTIC for creating dew drops on leaves, I suppose that's why they named it Morning Dew lol :D I also used their Nuvo creative pens alcohol markers too to add a deeper shade to the centre of the flowers and the arrow of the sentiment (Rich Reds 310N) and to colour my Acorns too (Natural Browns 317N) :D The acorns, leaves and main wreath with flowers are all Spellbinders dies from their Woodland collection, I absolutely LOVE these dies, and I hope to make more cards in the future like this one, because I've fallen in love with it :D Also to colour the acorn leaves I used a mix of Forest Green and Pine ProMarkers :D

When layering up the card, I cut multiples of the wreath to make it fuller and I cut this using Dark Roast Coffee Foundations card, I also cut a couple of sets of leaves in this colour too. Then I used Raspberry Foundations card for the flowers and sentiment, and I cut everything else from plain white card and coloured it myself :D I also added in foam pads to certain areas to add some extra dimension too... and for the finishing touches I added a little bit of clear sparkle, and I stuck on some Morning Dew Nuvo Drops which I had created earlier and left to dry overnight (I also showed how I had originally made these drops right at the end of the video, these are to replace the ones I used so I have some for next time :D) Hope you liked the card as much as me :D :D :D

To see the process behind this card, please watch my YouTube video below, or over on my channel CRaFTi PoTeNTiAl :D


To see more of the cards I've made using Tonic Studios products, please have a gander at the Playlist liked below :D


 A few more photos below :D


Saturday 26 November 2016

Fabulous Flamingos :D


A quartet of fabulous flamingo cards suitable for a few different occasions :D For these cards I used the Flamingo die (which came free with a past issue of Papercraft Essentials, issue 132) and I created a stamp from it using funky foam :D I also used a Flamingo stamp which came free in the Here Comes Summer stamp set from a past issue of Creative Stamping, I used the stamp as one of the flamingos, and then I also used it as a guide for adding outlines to the other flamingos too :D The legs on the flamingos are faaaarrr from perfect, but they give you the suggestion which is the main point :D And some of the outlining around the eyes of the flamingos gives them quite a grumpy look lol, but I think that adds to their character :D Although they're not perfect, I really do love the way these turned out, and this card design was actually inspired by a t-shirt I brought from Bon Marche :D I'll put a picture in further down :D

Initially for the stamping of the custom stamp flamingos, I used Spun Sugar Distress Ink, and for one of the cards I also experimented with adding in a little Abandoned Coral Distress Ink too :D For all the colouring I used a mixture of different brands of Alcohol markers, I used the Pink pack and the darkest Red from the Nuvo Creative pens line, I used a Vermillion FlexMarker, and I used Salmon, Magenta, Cool Grey 4 and Cool Grey 5 from my Promarkers, it just shows that they work together perfectly :D :D :D For the water at the bottom I used a couple of colours from the 36 pan set of the Gansai Tambi watercolours :D The sentiments came either from the Here Comes Summer stamp set or from a little Forever Friends stamp set that came free on an issue of Creativity Magazine ages ago :D Finally the silver foiling was done using the Pebeo Mixtion Relief Paste (which you do need to let dry before you add the foil!!, I left mine for about an hour :D) and the Pebeo silver mirror effect foil too, which gives a fantastic shine, but if you wanted more of a brushed metal look, gilding flakes would be perfect too :D Hope you liked the cards :D

To see the process behind this quartet of flamingo cards, please watch my YouTube video below, or over on my channel CRaFTi PoTeNTiAl :D


Tonnes more photos below showing all the different versions :D 


The inspiration of these cards :D Now I look back at what inspired me, they're not very similar, but that's the thing about inspiration it just sparks an idea in your head and then your brain runs away with it and makes it its own :D :D :D


Friday 25 November 2016

Nuvo Embellished Thank You Card :D


A purple and silver (my favourite colour combination!!) thank you card using three different types of #nuvo products; embossing powder, crystal/glitter drops and gilding flakes :D The perfect combination for a thank you card for my Nannie :D I started off with the background, using this large butterfly background stamp by Justrite which I brought a little while ago, and I used my MISTI to stamp it so that I could get a good impression (but as you can see in the photos the right hand side looks a bit off, turns out on a closer look at the stamp that its etched deeper on one side than the other, so it doesn't even stamp all the detail :/ I shall have to query that!!) and I also used some nuvo embossing powder, I just brought this as I was dying to try it out and see what its like, and of course I brought my favourite colour :D This ones called Purple Haze and it is GORGEOUS!! it's practically metallic :D In the pot I thought it looked as though it could be a bit sparkly, but this effect is stunning :D I might have to invest in some more colours! There's a lovely Jade colour which I've got my eye on :D :D :D

The main focal heart is the Floral Cascade die by Leonie Pujol and I die-cut this in white and also in Amethyst Foundations cardstock :D I then also die cut some small flowers using the same two colours, and I cut some leaves using Pale Grey and Slate Grey Foundations card too :D I felt like the heart was getting lost in the background a bit so, I decided to add some vellum behind it, and then I thought, "I just brought the lovely Silver Bullion nuvo gilding flakes, and I haven't used them yet..." so I thought why not experiment and see how well gilding onto vellum works (I love that snowflake vellum which already has the silver on that I used a few days ago, so though this might give the same effect!) And it worked :D Yay :D I used this little 'Thank You' stamp from the Paper Smooches Noggin Toppers stamp set along with some Cosmic Shimmer Flake and Glitter Glue and a little piece of Cut n Dry foam :) I added a small amount of glue onto some scrap paper, then loaded the foam to make my own glue 'ink' pad :D And once the glue had gone tacky, I then added my flakes :D And I decided it needed a little more silver so I also added a strip of double sided tape along the bottom of my card and gilded that too :D The finishing touch was then some nuvo crystal drops :D I used gloss white and silver moondust, and I used ones I had pre-made, but I show in the video how I made some more too to replace the ones I'd used :D Hope you liked the card :D 

To see the process behind this card, please watch my YouTube video below, or over on my channel CRaFTi PoTeNTiAl :D


And to see all the other cards I've made using Tonic products, please check out my Playlist which I've linked below :D


Plenty more photos to follow :D


I'm entering this card into the Simon Says Stamp Monday Challenge :D As I've used three different types of Nuvo products :D