Tuesday 28 February 2017

I'm So Jelly Seaside Shaker Card :D


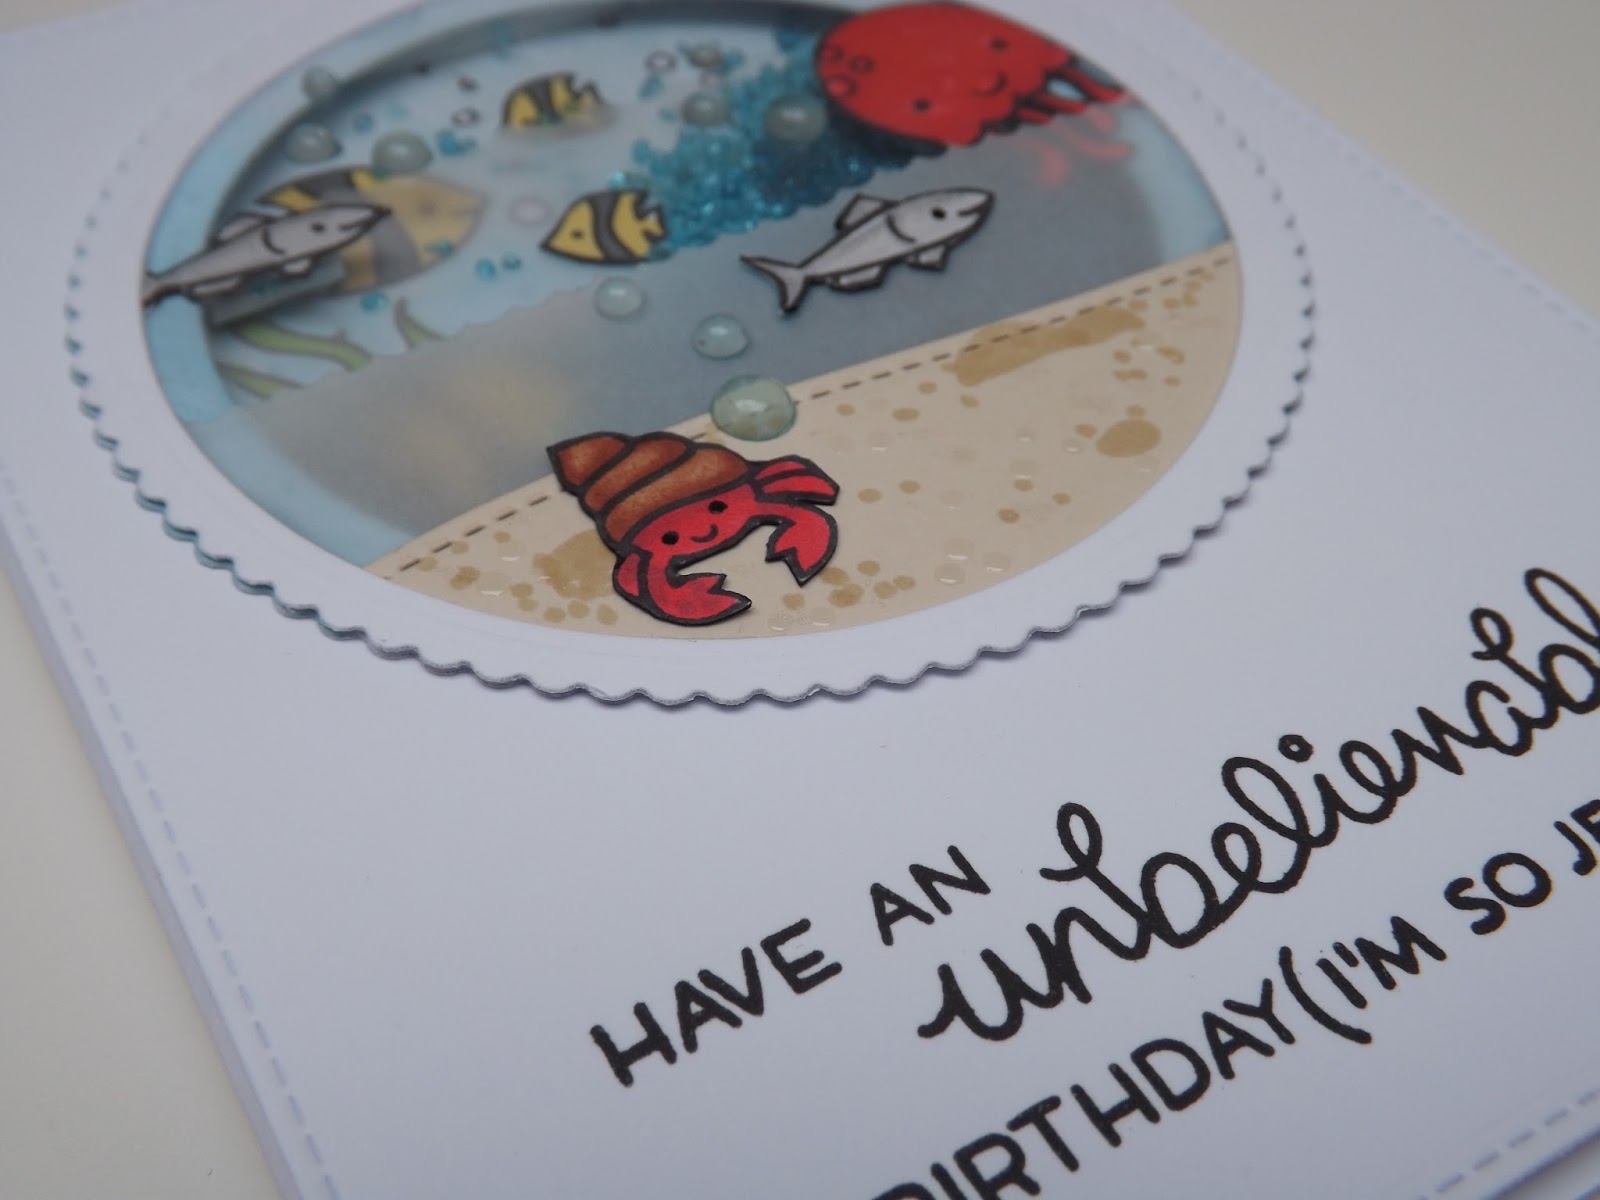
A fun seaside shaker card featuring a load of Tonic dies and a bunch of adorable Lawn Fawn stamps :D Did you know you could use the edge of a scalloped Tonic square or rectangle to create waves for an underwater scene :D Well, once you think of it it seems pretty obvious lol, but I had this idea a while ago, and have just gotten round to making it :D I love using a mixture of the nesting scalloped squares, and the smaller scalloped rectangles from the Harrop die set to give some perspective/variation to the waves too :D You can see in the video below how I stamped out all my images, and stamped extra ones too so that I could add them to the scene after assembling the different layers, and for all my colouring, I used my usual favourite, my Promarkers :D The final finishing touch was the addition of some pre-made Sea Breeze Nuvo Jewel Drops (TOP TIP: when sticking these onto the acetate portion of the shaker, the glue takes ages to dry, so leave it at least overnight or longer if you can :D) Hope you liked the card, please excuse my fingers in the photo above, the glass I used as the shaker elements (this is actually the stuff that model makers use to make realistic looking ponds, I got it cheap at my local garden centre) were quite heavy, and the card needed to be open wider than the depth of one of the steps, so I resorted to holding it :D :D :D

To see the process behind this seaside shaker card, please watch my YouTube video below, or over on my channel CRaFTi PoTeNTiAl :D 


Loads more photos below :D


Monday 27 February 2017

Hello Spellbinders Geo Heart :D


A pair of Geo hearts using the lovely die set from Spellbinders :D I tried two different methods for the inside pieces, including watercolouring, and also pattern matching patterned papers :D I think the watercolour effect is my favourite, as I've kind of steered away from pattered papers recently, but it's nice to try both methods, and I think I'd be more please with the patterned paper version if it had the plain white background like the other card lol :D Anyway, for the patterned paper card, I cut multiple hellos (included in the Geo hearts die set) and I stuck them all over the background, then added some watercolour (I'm thinking now just leaving it white on white would have looked better lol) Then for the Geo heart itself, I cut it once from white, and then twice from a double sided paper that had the same pattern but opposite colours on the two sides, then I cut the die from the same place in the pattern so that the pattern matched across the heart :D For the sentiment I simply used the lovely hello die from the set, and I added some wink of Stella and a layer of 3D gloss to give it an enameled look :D The final finishing touch was then some pre-made Key Lime Nuvo Jewel Drops :D Hope you liked the cards! Don't forget, there will be a new Spellbinders video every Monday :D

Spellbinders Products used in this video :D
Shapeabilities Hello Geo Heart Wild & Free by Debi Adams
Main Attraction Magnetic Tool
Spellbinders Platinum Die-Cutting and Embossing Machine 

To see the process behind this pair of Geo Heart cards, please watch my YouTube video below, or over on my channel CRaFTi PoTeNTiAl :D


Lots more photos below :D


Saturday 25 February 2017

Darling Dolies and the Gelli Plate :D


A trio of Darling Doily cards :D I just brought these adorable little Gelli plates, and I couldn't wait to use them, and this doily die set was just the perfect size, so here's what I did :D This really versatile stamp and die set is free with issue 21 of Die-Cutting Essentials :D :D :D  This issue went on sale on Thursday 23rd Feb 2017 and you should be able to get it from moremags.com, in the supermarkets and I think CraftStash.co.uk sell the current issues now too :D

Two of these cards were basically me just having fun messing around with my new Gelli plate, the card I was actually aiming to make is the one in the middle above, and was actually the first print I pulled :D However I just carried on printing and adding paint and printing and I created two very busy backgrounds as well :D I really like the card on the left above as well as the intended middle one, but I'm not that sure about the one on the right, I think maybe if I changed the sentiment I'd like it more, but anyway, we all make cards we're not that keen on once in awhile, and funnily enough I often get comments from people saying they loved the one I hated lol, so it's all down to personal taste :D Anyway, you can see the processes behind building these backgrounds in the YouTube video below, so enjoy, and I hope you liked the cards :D See you on Monday! I'm changing how often I upload, so CRaFTi will now have new videos every Mon, Tue, Thur, Fri and Sat (instead of everyday! I can't believe I managed 212 days continuously uploading a new video everyday!!!) and ArTi will have an art journal video on a Wednesday, and there might be the odd video on a Sunday too :D :D :D

To see the process behind trio of Gelli printed cards, please watch my YouTube video below, or over on my channel CRaFTi PoTeNTiAl :D


Tonnes more photos below :D 


Friday 24 February 2017

You Nailed It :D


A couple of clean and simple cards with a subtle ink blended background and a cluster of focal images both made using some of the absolutely gorgeous stamps from the Handmade with Love A4 stamp set free with issue 40 of Creative Stamping :D P.s. I might have a few of my cards in this magazine too :D :D :D And there might even be one of them on the cover :D :D :D It's sooooo exciting seeing one of my cards in pride of place on the front of a magazine!!! This is the first time I've been on the cover for Creative Stamping :D :D :D

So a pair of really simple cards, firstly I started with some subtle ink blending in the centre of the panel using Peacock Feathers and Cracked Pistachio Distress Ink, then I added some subtle stamping with the sentiment for each card using Soft Pool and Tide Pool Hero Arts inks :D I stamped out my main focal elements using Jet Black Lawn Fawn ink (this ink is alcohol marker friendly) and I coloured them all using my usual favourite, ProMarkers :D For the tool box, I stamped the front section twice and added a sentiment to one of them, then I partially cut this out so that I could create a 3D effect and tuck the tools in behind :D I also added some splashes to the background just by watering down some Peacock Feathers ink and splashing it with a small round paintbrush :D The final finishing touch was then a scattering of iridescent sequins and a few dibs and dabs of wink of stella :D Hope you liked the cards :D

To see the process behind this pair of clean and simple cards, please watch my YouTube video below, or over on my channel CRaFTi PoTeNTiAl :D


Lots more photos below :D


Thursday 23 February 2017

Happy Birthday Hydrangea :D


A pair of really simple Hydrangea cards using the stencil and stamps free with issue 160 of Simply Cards and Papercraft :D For the main technique, I used the stencil and some colourburst powders, I sprayed through the openings of the stencil, then simply tapped the colour on :D Such a quick and effective technique :D So literally all I did was place the stencil on the card, spritz with water, then I sprinkled on pink and purple powders, I then dried this with my heat tool :D Then I came back and lined the stencil up again, spritzed it with water again, then added a couple of green colours to the leaves and stem, then dried this too :D And to finish it off, I used some of the free stamps and some gold embossing powder to add the sentiment and some little critters too :D I actually used two different brands of embossing powder, Tonic and Cosmic Shimmer as I wanted to compare, and as the Cosmic Shimmer one is a detail powder, it did give a better definition, but the Tonic powder gave a more raised effect :D (scroll right down to the bottom to see the close up photos and I'll point out which is which :D) I then simply added a scattering of gold sequins, and that was it :D Hope you liked the cards :D Don't forget to get your copy of Simply Cards and Papercraft 160, it's out today, or you can always order it online at moremags.com, and I think CraftStash.co.uk might sell them now too :D

To see the process behind this pair of Colorburst Hydrangea cards, please watch my YouTube video below, or over on my channel CRaFTi PoTeNTiAl :D


Hundreds more photos below :D


Above is the Tonic Gold embossing powder :D And the four close-ups below are the Cosmic Shimmer detail powder :D