Tuesday 31 January 2017

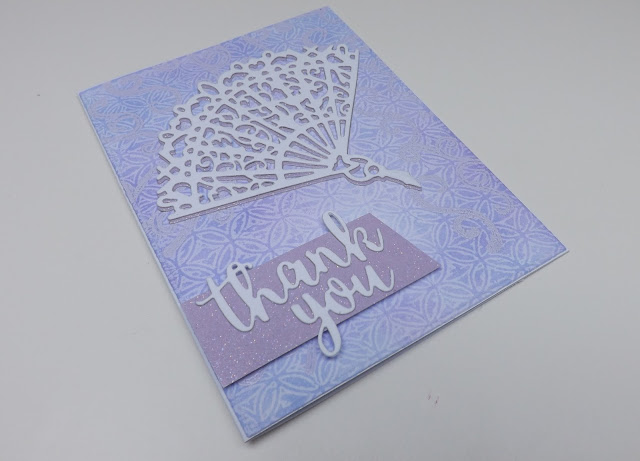
Fan-k You Wax Paper Resist :D


A punny take on the typical Thank You card, using the Delicate Fan die from Tonic Studios to turn a Thank You card into a 'Fan-k You' card :D  To create the background for this pair of cards I used a wax paper resist technique involving an embossing folder and a Stix2 Craft and Mixed Media iron :D For this technique, firstly you need to take a piece of wax paper, and emboss it with any embossing folder you like, you then sandwich this between two pieces of card, and put this inside a folded piece of printer paper :D Place this on top of a folded towel, then use your Stix2 craft iron to iron it, the heat from the iron will melt the wax from the wax paper, and transfer it to both pieces of card in a positive and negative pattern :D :D :D This is such a cool technique! and I've been dying to try it for ages, so fan-k you so much Stix2 for sending me one of your irons!! It's fabulous :D :D :D

Once the wax has cooled (which literally takes seconds) you can then apply distress inks over the top with an ink blending tool, I want to experiment more to see if you can use spray inks to colour this too, but I tried for a previous background cutting some intricate leaf dies for this technique, then using spray inks, but it didn't work very well, but I haven't figured out yet if it was because I didn't iron it for long enough or if the die-cuts were too delicate, but I will be experimenting more :D :D :D
To add some extra interest to the edges of the background I did some heat embossing using some Tonic Stamps and a Nuvo Embossing powder too :D (I used Soft Lilac Embossing Powder 607N and the Autumnal Spring stamp set 1364E) :D For my focal element I used the Tonic Studios Rococo Delicate Fan Die (090E) I had this idea to do the sentiment 'Fan-k You' a while ago, as I thought it would be perfect for my Nan as she's always using a fan like this lol :D To create the Fan-k I used a combination of the Scripty Thanks and Scripty Friends dies from Lawn Fawn, and the other word dies I used are from the Avery Elle A Tag For All die set :D Hope you liked the cards! I only did one of them with my punny sentiment, as I'm never sure how obvious my puns are lol, so to clarify I left one as the normal Thank You :D :D :D

To see the process behind these two cards, please watch my YouTube video below, or over on my channel CRaFTi PoTeNTiAl :D


Lots more photos below :D


I'm entering this card into the Win and Tonic Take Your Pick January 2017 Challenge :D

Monday 30 January 2017

Elegant Framed Congrats :D


A more elegant card today using lots of Spellbinders dies to create a lovely layered frame :D I also used one of the Geo dies from Spellbinders to create a background stamp from funky foam to add some subtle pattern, and I used a few colours of Tonic Studios Nuvo Mousse to add that touch of luxury too :D The Embellishment Mousse colours I used are Aquamarine and Spring Green :D And I also used Sea Breeze Jewel Drops for my final finishing touch too :D

The dies I used:
Becca Feeken Amazing Paper Grace - Cinch and Go Flowers
Becca Feeken Amazing Paper Grace - Loop Roll Flowers (the leaves)
Becca Feeken Amazing Paper Grace - Cascading Grace
Becca Feeken Amazing Paper Grace - Flourish Frame (the rounded rectangle shape)
Geo Collection - Symmetry in Space 
And then I also used my usual favourite, the large stitched rectangle from MFT Blueprints 13 and also the Scripty Congrats die from Lawn Fawn too :D

So I started off with a piece of Aqua Foundations cardstock, then I used my home made 'stamp' made using the Symmetry in Space Geo die and just used Perfect Medium ink to give a watermark effect :) I then die cut multiples of the Cinch and Go flowers from white card to create a stencil (but I can still use the flowers later too) and I then applied some Aquamarine Nuvo Embellishment Mousse through the openings with my finger (plus I then decided to cover the 'stencil' I had made entirely with the Mousse so that I could use it on the card too :D) I had used Pastel Green Foundations Card to die cut my leaves a flourishes, so I then used some Spring Green Nuvo Mousse to liven these up a bit, again just applying it with my finger, being gentle so I didn't rip any of the delicate die-cuts :D Once the mousse is dry (which really doesn't take long at all) you can use a piece of kitchen roll to buff the surface and give it a lovely shine :D So I didn't waste any of my lovely delicate die cuts, I took the rounded rectangle die from the centre of the Flourish Frame, and drew around it with a pencil to give myself a guide, I then proceeded to stick down all my elements using a fine tip applicator bottle and some Cosmic Shimmer glue :D To give the frame an extra dimension, I then ran it through in a swirly embossing folder after die-cutting it into the frame shape :D :D :D

Inside the frame, I layered up a piece of Pastel Green card covered in the Spring Green Mousse like the leaves, followed by a white die-cut of half of the Cascading Grace die, then I added 3D foam to the back of the frame and adhered it to a piece of vellum, and my final layer was to add my homemade 'stencil' behind to tie the whole card together :D I then used the interior of the frame to die cut the shadow for my sentiment, then I simply added this whole piece to a card blank and finished it off with some Nuvo Jewel Drops and a clear sparkle pen :D Hope you liked the card, don't forget to watch the video below which shows visually how I made it :D

To see the process behind this card, please watch my YouTube video below, or over on my channel CRaFTi PoTeNTiAl :D


Lots more photos below :D


I'm entering this card into the Simon Says Stamp Anything Goes Wednesday Challenge :D and also the Win and Tonic Take Your Pick January 2017 Challenge too :D

Sunday 29 January 2017

Belated Birthday Wishes :D


A funny card taking the lolly pop from the phenomenal Truly Scrumptious stamp set (free with issue 39 of Creative Stamping) and turning it into a snail :D Then of course I just had to add the sentiment 'belated birthday wishes' :D I love drawing little critters such as snails, bumblebees, butterflies etc... so I just had to make this into a snail :D

To create the sentiment, I used the 'belated' word from the Lawn Fawn Year Two stamp set, and then I also cut the words 'birthday' and 'wishes' from other sentiments from the Truly Scrumptious stamp set :) I'm fine with cutting into my sentiment stamps like this, as you can easily place them back together on the acrylic block :D (and actually I do just that with one of these sentiments in the video which will go up next Sunday :D) You can see in the video below, how I masked off the stick of the lolly using some washi tape to just stamp the swirl (okay I could have done this a little bit neater lol, but hey, it worked :D) then I used a black PITT pen to draw in my snails body :D For the sky, I used some Peacock Feathers Distress Ink to lightly blend on some colour, then I used my Hero Arts Pastel Blue ink along with the clouds from the Bon Voyage Lawn Fawn stamp set, and I also die-cut some clouds from white card and vellum using the Spring Showers Lawn Fawn die set (LOVE this set of dies :D) Hope you liked the card :D I've got a card using Spellbinders dies and Tonic Nuvo Embellishment Mousse that will be going up tomorrow :D :D :D

To see the process behind this card, please watch my YouTube video below, or over on my channel CRaFTi PoTeNTiAl :D


Plenty more photos below :D 


I'm entering this card into the Simon Says Stamp Anything Goes Wednesday Challenge :D

Saturday 28 January 2017

Ink Swiping Butterfly Thank You :D


A duo of Butterfly cards using the absolutely beautiful Butterfly Wishes die and stamp set which is free with issue 20 of Die-Cutting Essentials :D The design of this pair of cards was actually inspired by a t-shirt I have :D So I attempted to re-create the effect by creating a stencil from acetate and swiping some ombre ink pads over the top :D I think it came out pretty well, but I think any card you make with this freebie will look gorgeous, just look at the butterfly, it's stunning :D I've got a few more ideas up my sleeve for this set, so you might be seeing a few more videos over the next few weeks if I get round to making them :D

So for my background, I started by taking a piece of acetate and adding some washi tape around the edges so it's easier to find on my desk lol, and for you to see in the video too :D And I die cut the solid butterfly (Top Tip: If you add a piece of paper underneath your acetate it cuts much better :D) And then I used a combination of washi and some temporary spray glue to keep my 'stencil' flat on my card, and I simply swiped my ombre ink pad over the top, and I also used either a blending tool, or a piece of kitchen roll to wipe some of the excess ink from the 'stencil' onto the image to give a crisper more defined edge :D The ombre inks I used are from Hero Arts, and then I also used some really pale Altenew ink colours to stamp the 'sending butterfly wishes your way' flourish all over the background and I squished a little bit of the darkest colour of the ombre ink onto my Tonic A3 plus glass mat, added a smidgen of water and flicked the colour over the background with a fine paintbrush :D As another layer to the background I also used the ombre ink pads to add the detailed butterfly stamp over the top :D

I then created the backing of my focal butterflies in the same way, but used the die to cut them out, and then I stamped the image on top in black :D I stamped the butterfly trail, the fancy antenna and also a separate 'thank you' sentiment, and I used some varied sized black pearls to create my butterfly body (I LOVE doing this, one of my signature card designs that I kept re-creating in slightly different ways used this method of adding the gems to the body, so I've gotten through quite a few different types of these black gems/pearls in the last few years lol :D) Hope you liked the card :D

To see the process behind this pair of cards, please watch my YouTube video below, or over on my channel CRaFTi PoTeNTiAl :D


Loads more photos below :D


I'm entering this card into the Simon Says Stamp Wednesday Anything Goes Challenge :D

Friday 27 January 2017

You're My Cup of Tea :D


A tea cup aperture card using the tea-riffic Time for Tea free gift from issue 159 of Simply Cards and Papercraft :D This set is gorgeous for all age groups I think, and I thought it went perfectly with this Gemini die from #creativeexpressions as it reminds me of a lacy table cloth :D I decided to make this particular card into a Get Well Soon card, you can never have too many of them at this time of year, as everyone's always getting colds (including me lol) :D As soon as I saw this freebie, I had the idea of a vertical triple aperture of the tea cups, but originally I had planned to add some glitter behind the apertures, however I'd recently inherited a few Brilliance ink pads, and I thought the purple one would look fab on this Heather Foundations cardstock from Creative Expressions, and I just love the floral stamp in this set, so I thought they made the perfect combination to create the apertures background :D

After adding the gorgeous Sue Wilson lacy border (Real Name: Auriga Gemini Die) and the label style get well soon sentiment (I love adding my sentiments like this, as though its a label sticking out, like on an item of clothing :D) I felt like there needed to be some more black on the card to tie in the black of the sentiment, so for my finishing touches, I used the cluster of hearts stamp from the free stamp set along with some #tonicstudios Ebony Black Gloss Nuvo Crystal Drops (which I had pre-made before hand so they're easier to apply to my finished card :D) Hope you liked the card, there will be another video up next week using this freebie too :D I'm having the spread the magazine freebie videos out this week as there were three new magazines published yesterday lol and they all have gorgeous free gifts :D :D :D

To see the process behind this card, please watch my YouTube video below, or over on my channel CRaFTi PoTeNTiAl :D


A few more photos below :D There will also be another video up next week using this magazine freebie again too :D


I'm entering this card into the Simon Says Stamp Anything Goes Wednesday Challenge :D and
The Win and Tonic January 2017 Take Your Pick Challenge too :D

Thursday 26 January 2017

How've You Bean? :D


A fun punny card using the gorgeous Truly Scrumptious stamp set free with issue 39 of Creative Stamping  :D I really love this stamp set, and I actually have some of my cards in the magazine showing how you can create backgrounds with some of the smaller stamps and the sentiments too :D If you flick through to page 14 you'll be able to see the 5 cards I made for my Brilliant Backgrounds feature :D :D :D It still makes me soooo happy to see some of my cards in a magazine!! Literally a dream come true :D :D :D So grateful to everyone at Practical Publishing for making it happen :D

Anyway, back to the card :D I knew I wanted to use the sweetie jar, as I hadn't used it for the cards in my feature, and I wanted to think up a punny sentiment too, and for this one I was inspired by my friends whose surname is Broad, and they like to refer to each other as Mr and Mrs Broad Bean lol, and I thought why not use this with the jelly beans in the set, so I settled on 'How've you bean?' maybe it's quite loosely inspired by them lol, but it made sense in my head lol :D I also thought this was appropriate as I've been mostly posting Gallery videos recently, so its a bit like, I'm back, how've you bean lol :D I hope you've enjoyed the gallery videos, there's only one more left to come, and that should go up on Wed 1st Feb :D So I'll be back to just my usual card making videos now :D I have to say I noticed when I was editing this video today, that I've really missed it lol :D Also a few days ago I realised I've managed to post a video everyday for the last 6 months!! It's insane!! lol and I think if I keep going with the daily videos till the 9th of Feb, that'll be 200 days running, and considering I thought getting to 100 days would be a mammoth task, I'm very surprised I'm almost at 200 :D :D :D After that it might not be completely daily, but I reckon I'll still be uploading 5 videos a week, and I'm starting a new channel too (watch this space :D)

Sorry, went off on a tangent again... back to the card, so I used my Hampton Arts Stamp Perfect Stamp positioning tool for this card, because one I wanted to stamp out two so I have another card to colour, and two I was trying out a new ink pad I just brought, the Lawn Fawn Jet Black ink, which is supposed to be similar to memento tuxedo black, so I thought I might want to stamp some of the images multiple times to get a nice black image (and I did lol) :D But this ink is great for colouring with alcohol markers :D To get the jelly beans inside the jar, I used some full sticky post-it notes to mask off the background of the card, then I used the jelly bean pile stamp, used a mask to mask that, then stamped it again etc.. until I had filled the whole jar with jelly beans. Then I just picked out some lovely bright colours of Promarkers and used them to colour in all the beans, give a little bit of shading to the glass jar, and to add a wood effect table :D Then finally for the sentiment I used the Lawn Fawn Smitty's ABC stamp set :D I LOVE this set because it looks like my hand-writing, and my surname is Smith, so it's very fitting lol :D Hope you liked the card :D There'll be another magazine freebie video tomorrow using the gorgeous Time for Tea set from Simply Cards and Papercraft 159 :D

To see the process behind this card, please watch my YouTube video below, or over on my channel CRaFTi PoTeNTiAl :D


Plenty more photos below :D


I'm entering this card into the Simon Says Stamp Anything Goes Wednesday Challenge :D

Wednesday 25 January 2017

CRaFTi PoTeNTiAl Gallery 2016 #13 :D


Here's the thirteenth gallery video of the series :D Each video will contain 10 cards, and the video description along with the blog post will contain links and embedded videos so that you can easily find the video you're looking for :D This idea was given to me by one of my lovely subscribers, so I hope you all enjoy these gallery videos :D

CRaFTi PoTeNTiAl Gallery 2016 #13 :D


Christmas Tree Aperture Trio :D


One Card Design for Two Occasions :D


Peace Shaker Christmas Card :D


Pinecone Christmas Tree :D


Winter Thanks :D


Movie Camera Shaker Cards :D


40th Birthday Christmas Combo :D


Stay Home and Snuggle up This Christmas :D


Tank You Stix2 You're Fintastic :D


Umbrella Shaker Card :D


Hope you enjoyed looking back on some of the cards I'd made in 2016 :D

Tuesday 24 January 2017

CRaFTi PoTeNTiAl Gallery 2016 #12 :D


Here's the twelfth gallery video of the series :D Each video will contain 10 cards, and the video description along with the blog post will contain links and embedded videos so that you can easily find the video you're looking for :D This idea was given to me by one of my lovely subscribers, so I hope you all enjoy these gallery videos :D

CRaFTi PoTeNTiAl Gallery 2016 #12 :D


Tonic Pinecones with Pebeo Fantasy Paints :D


Tonic Nuvo Drops Bumblebees :D


Nuvo Embellished Iris Folded Holly :D


Christmas Greetings Poinsettia :D


Scribbly Bauble Christmas Card Trio :D


Warm Winter Wishes Christmas Card :D


Christmas Wishes Embellishment Mousse Stamping :D


A Trio of Christmas Greetings :D


Number Dies Christmas Card :D


Number Dies Birthday Celebrations :D


Hope you enjoyed looking back on some of the cards I'd made in 2016 :D

Monday 23 January 2017

CRaFTi PoTeNTiAl Gallery 2016 #11 :D


Here's the eleventh gallery video of the series :D Each video will contain 10 cards, and the video description along with the blog post will contain links and embedded videos so that you can easily find the video you're looking for :D This idea was given to me by one of my lovely subscribers, so I hope you all enjoy these gallery videos :D

CRaFTi PoTeNTiAl Gallery 2016 #11 :D


Nuvo Embellished Thank You Card :D


Fabulous Flamingos :D


Sent With Love Autumn Wreath :D


Ink Blended Thank You :D


Nuvo Mousse on the Gelli Plate :D


Tudor Inspired Birthday Card :D


Altenew Joy to the World :D


A Note of Thanks this Christmas :D


Altenew Merry Christmas to Someone Special :D


Thinking of You this Christmas :D


Hope you enjoyed looking back on some of the cards I'd made in 2016 :D

Sunday 22 January 2017

CRaFTi PoTeNTiAl Gallery 2016 #10 :D


Here's the tenth gallery video of the series :D Each video will contain 10 cards, and the video description along with the blog post will contain links and embedded videos so that you can easily find the video you're looking for :D This idea was given to me by one of my lovely subscribers, so I hope you all enjoy these gallery videos :D

CRaFTi PoTeNTiAl Gallery 2016 #10 :D


Geometric Merry Christmas :D


Oh Deer, I Forgot... :D


You're A Spec-Tacular Parent :D


It's Your Time to Soar Shaker Card :D


Nuvo Pens Hope You Feel Better Soon :D


Celebrate :D


Winter Wonderland Thank You :D


Be-you-tiful Butterfly :D


Have a Fantastic Birthday using Tonic Dies :D


A Trio of Valentine Cards :D


Hope you enjoyed looking back on some of the cards I'd made in 2016 :D

CRaFTi PoTeNTiAl Gallery 2016 #9 :D


Here's the ninth gallery video of the series :D Each video will contain 10 cards, and the video description along with the blog post will contain links and embedded videos so that you can easily find the video you're looking for :D This idea was given to me by one of my lovely subscribers, so I hope you all enjoy these gallery videos :D

CRaFTi PoTeNTiAl Gallery 2016 #9 :D


Autumn Leaf Trio :D


Totally Teal Flowers :D


Best Witches :D


No Tricks Just Treats :D


Eye Wish You a Spooky Birthday :D


Happy Halloween 2016 :D


Nuvo Embellished Cascading Butterflies :D


Thank you Snowflakes :D


Warm Winter Birthday Wishes :D


Cold Days, Warm Hearts :D


Hope you enjoyed looking back on some of the cards I'd made in 2016 :D

CRaFTi PoTeNTiAl Gallery 2016 #8 :D


Here's the eighth gallery video of the series :D Each video will contain 10 cards, and the video description along with the blog post will contain links and embedded videos so that you can easily find the video you're looking for :D This idea was given to me by one of my lovely subscribers, so I hope you all enjoy these gallery videos :D

CRaFTi PoTeNTiAl Gallery 2016 #8 :D


Congrats on Your Amazing News :D


Congratulations on Your Engagement Balloons :D


Botanicals Thanks a Bunch :D


Messy Christmas Cards :D


Congratulations on Your Engagement Hearts :D


Pearly Heart Anniversary Congrats :D


Champagne Congrats :D


Geometric Ballerina :D


May Your Birthday Sparkle :D


Happee Birthdae Golden Snitch :D


Hope you enjoyed looking back on some of the cards I'd made in 2016 :D

Thursday 19 January 2017

Pretty Quick Stained Glass Rosebuds :D


A  really quick trio of cards using the Pretty Quick Stained Glass Rosebuds die which is now available from CraftStash.co.uk :D For these cards I cut the die from funky foam, then trimmed out the focal elements, stamped with Aquamarkers, then sprayed with water :D A very simple technique for some really quick and simple thank you cards :D For the final embellishments I added a scattering of sequins and some doodled borders :D Hope you liked the cards :D There should be another gallery video up tomorrow, I just need to edit some more of them first :D

To see the process behind this card, please watch my YouTube video below, or over on my channel CRaFTi PoTeNTiAl :D


Loads more photos below :D